Index
-
Editing Website Content
- Joomla BackOffice Login
- What content on my website can I edit?
-
How to edit an article
- Adding an image
- Adding a hyperlink
- Adding a file hyperlink
-
How to edit a module
- General module
- News feed module
- Homepage slideshow
- Adjusting the sitemap and navigation
- Adding a new page
-
Email Newsletter
- Setup
- Weekly Market Update
-
Email Newsletter
- Building an email newsletter
- Adding in your own content
- Mass Email
- Email Analytics
- Website Components
Editing Website
Joomla BackOffice
The Joomla BackOffice is where you will go to edit your website, send email newsletters, write a blog, post to social media, and more. The information needed to access the BackOffice of your website (URL, username and password) should have been sent to you by your Project Manager. If you need it re-sent, email This email address is being protected from spambots. You need JavaScript enabled to view it.. Your password can be recovered at your BackOffice URL by clicking on "Forgot Password."
What content on my website can I edit?
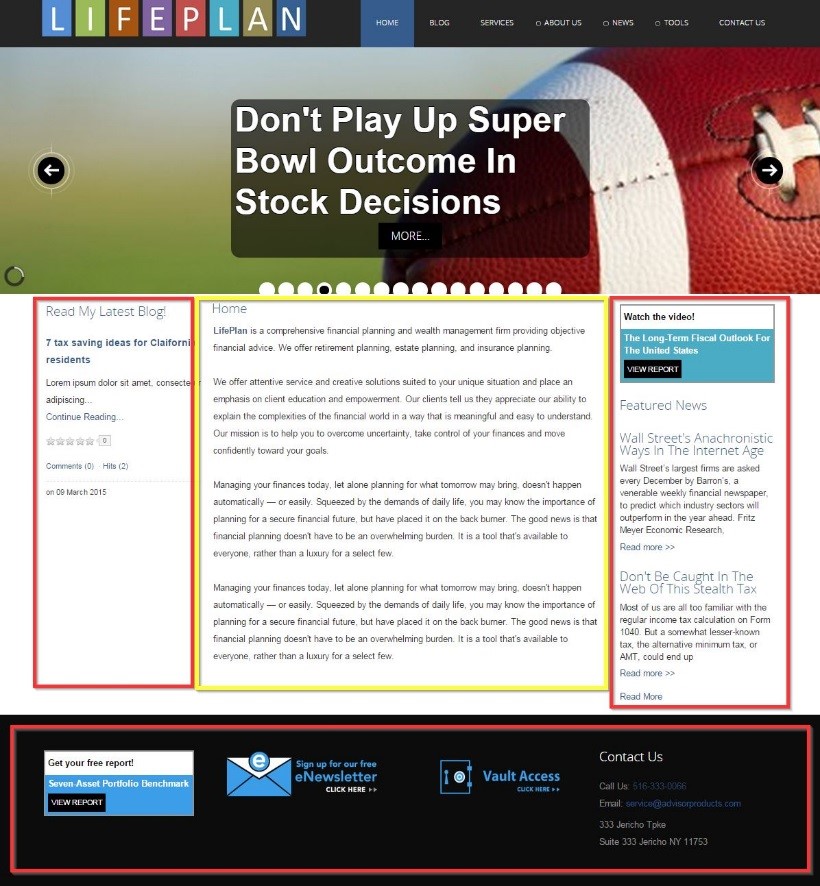
You can edit almost all of the content on your website. Most areas on your website will be either an Article or a Module in the website BackOffice, although there are a few exceptions. An "Article," is the main text content on each page (highlighted by the yellow box in the middle of the diagram below). "Modules" are distributed throughout the website and typically found along the sides of the pages or below or above the "Article" (highlighted by the red boxes). While articles are specific to a single page, a module can appear on several pages, such as the "Contact Us" module in the bottom right of this image that is displayed on every page throughout the website.
How do I edit an article?
Log-in to the website BackOffice, hover over "Content" in the navigation, and select the "Article Manager" dropdown. Or, simply click the Article Manager button from the BackOffice Control Panel.
The Article Manager shows a list of all the articles for the pages on your website. Active Articles are marked with a green checkmark, while inactive Articles are marked with a red dot. Clicking on the title of an Article will open the editor where you can make changes. Make sure to Save & Close the Article - once you are done making your changes.
Watch the video on editing content: http://joomlatraining.advisorproducts.com/editing-content
-
Adding an image:click the "image" button to open the Image Properties window. Browse the server for an image to upload. Set a pixel width and height if needed, and add a HSpace (horizontal buffer) or VSpace (vertical buffer) around the image to give it proper spacing from the edge of the page. 10 pixels is good distance to start. Hit OK to insert.
- Watch the video here: http://joomlatraining.advisorproducts.com/add-photo
-
Adding a hyperlink:highlight the text you wish to hyperlink, and click the "link" button to open the Link window. Paste in the URL you want the text to direct to. If you are directing users to a different website, you will want that hyperlink to open in a new tab. Click the Target tab of the window and select "New Window (_blank)" to do so. Otherwise, leave the Target tab as is to simply have the page redirect. Hit OK to insert the hyperlink.
- Watch the video here: http://joomlatraining.advisorproducts.com/add-hyperlink
-
Adding a file hyperlink:highlight text you wish to hyperlink to a file (ex: PDF doc) and click the "link" button to open the Link Window. Click "Browse Server" to either locate a file already uploaded, or to upload a new one from your computer, and click Insert. Hit OK to insert the file hyperlink.
- Watch the video here: http://joomlatraining.advisorproducts.com/add-file-hyperlink
How do I edit a module?
Hover over "Extensions" and select the "Module Manager" dropdown. The modules used on your website will be listed out. Active modules are marked with a green checkmark, while inactive modules are marked with a red dot.
Click on the title of a module to edit it. At the bottom, the Menu Assignment section determines which pages the module displays on. Various options for that module are listed on the right side.
There are several different types of modules. General modules are text, usually with a title, description and a link to read more. They can describe services the firm provides on the homepage, for example. News feed modules will feed articles from Advisor Products, with snippets and a "read more" link, and can automatically update with new posts. Another module is the homepage slideshow, which will be the rotating banner images on the homepage and the text on top. If you need help editing a different module type you can email our service team at This email address is being protected from spambots. You need JavaScript enabled to view it..
- General module: These simple text modules are edited in a similar manner as an article. Just find the module in the Module Manager and click on the title to open. From here, you can change the title that displays at the top, or the content within the module from the editor. If there is a "read more" link in the editor which you want to change, you can treat it like a usual hyperlink.
- News feed module: These will typically display feeds from our Featured News and Financial Briefs pages. Open the module from the Module Manager and you will see the Configuration Options on the right side. The "Select Method" option allows you to choose for it to update automatically with the most recent articles we post, or allow you to choose specific articles that never change. The "Count" dictates how many news articles display at a time (typically 1-3), and the "Limit words" option determines how many characters the snippet will be.
- Homepage Slideshow: this is often titled "mod_builtinslideshowwide." On the right hand side, you'll see options to set the image, label, and links for each slide. In each of these boxes, insert a comma "," to separate each slide. The Image Path pulls an image that you upload to the Media Manager in your BackOffice (Content -> Media Manager). Image Label is the text that will display on the slides. Image Links is what the text on the slide will hyperlink to. You can leave the Label and Links boxes blank if you wish.
How do I adjust the navigation?
Hover over "Menus" and click on the "Main Menu" dropdown. Each navigation menu item will be displayed here. To adjust the order of a dropdown, select the Up arrow or the Down arrow under the Ordering column. Be careful as improper adjustments may turn one of your dropdown menu items into a main header. Email our service team (This email address is being protected from spambots. You need JavaScript enabled to view it.) if you would like assistance.
You can also unpublish pages (hide them) by clicking the green checkmark under the Status column. Pages that are currently unpublished show a red circle. Click on a red circle to display that page again.
How do I add a page?
To add a page to your website, you will first need to create an Article for that page. Hover over "Content", select "Article Manager" and then "New."
Title the Article and leave the other options as is. Type or paste in the content you want displayed on the page in the editor box. When finished, click "Save & Close."
Now you need to create a menu item for the article to display on. Go to "Menus," select "Main Menu" and click "New." The first field asks for a Menu Item Type. Hit the Select button and choose "Single Article." Give the page a Menu Title. If you want this page to display as a dropdown under a main navigation header that is already created, select that main navigation header under the Parent Item field. If this will be a new main header at the top of your site, leave the Parent Item option as is.
On the right column under the Required Settings, click the "Select/Change" button and select the article that you just created for this new menu item. Then, click "Save & Close."
Email Newsletters with Constant Contact
With your website you get the ability to send Advisor Products news content to your clients and prospects. Each article links back to your website. You get access to three formats: Email Newsletter, Weekly Market Update, and Mass Email.
Email Newsletter lets you easily send Advisor Products articles in a custom newsletter. They can be added alongside an advisor's own content. Weekly Market Updates can be automatically sent each Friday and summarize the markets for week, contain 1 link to an outside article, and 2 links to articles on your website. Mass Emails are a blank template for your use.
Before sending any emails, you will need to complete the setup.
Setup
You will need to configure your Constant Contact account and the Email Newsletter component in your BackOffice, and connect the two. Your contacts in your Constant Contact account are pulled into the website BackOffice, so you only need to upload them there.
Constant Contact setup
-
Login to your Constant Contact account using these credentials
- URL: https://login.constantcontact.com/login/
- Username: your email address
-
Password: AdvisorProducts1
- After logging in for the first time, make sure to change your password
-
Enter your firm’s address
- Once logged in to Constant Contact, go to “My Settings” in the top right. Then, in the Organization Address box on the right side, click on “Edit Address” and fill out the information. Make sure to save.
-
Verify your email address
- You can set any email address to be the “from” email address when people receive your emails. You just need to verify that email address as being real.
- Click “My Settings” again in the top right. Then, click “Verify Address” towards the top. You should see your email address listed, and the status of whether or not it is already verified. To verify your email address, or any other one you’d like to be the “from” address, enter it in the box below and hit “send verification email.”
- Those email address should quickly receive an email in their Inbox asking to follow one link to verify the address as real. Check your Spam folder if you don’t see it within 10 minutes.
-
Import your Contacts
- Click on “Contacts” in the top right of the screen.
- You can import contacts through Salesforce or Outlook automatically, or upload in bulk through an excel file.
- If you have an existing website with Advisor Products and have been sending out newsletters and Weekly Market Updates through the old system, our team can transfer your contacts over for you. Please just email This email address is being protected from spambots. You need JavaScript enabled to view it. and ask them to transfer your contacts into your Constant Contact account and they will do so.
- Once your contacts are uploaded, you can segregate them into groups such as “clients” and “prospects.” These groups will be seen in the website BackOffice as “lists” and can be sent different emails.
Website BackOffice Setup
- Login to your website’s BackOffice
-
Go to the Email Newsletter setup
- From the “Components” dropdown at the top, select “E-Newsletter”
- Click the “Set Up” box
-
Fill out the information in this “set up” tab
- Get the API key by using your Constant Contact login credentials
- Upload your logo and connect your social media accounts at the bottom
- On the right side “details from email campaign service,” you will select which verified email address you want as the “from” email address in your emails
- Hit the “save” checkbox in top right once completed
-
Go to the next tab "Weekly Update Set Up"
- Customize the Weekly Update Subject line if you want
- Check the box for "Send Weekly Update every Friday automatically"
- Check the box for the list(s) you want to send the Weekly Update to
- In the text boxes below, you can write a custom intro and add in a disclosure
- Click the "save" checkbox in the top right when completed
- Watch this video for setup help:
Weekly Market Update
- Weekly Market Update
-
Go to the Email Newsletter setup
- a. From the “Components” dropdown at the top, select “E-Newsletter”
- b. Click the “Set Up” box
-
Click the second tab "Weekly Update Set Up"
- Customize the Weekly Update Subject line if you want
- Check the box for "Send Weekly Update every Friday automatically"
- Check the box for the list(s) you want to send the Weekly Update to
- In the text boxes below, you can write a custom intro and add in a disclosure
- Click the "save" checkbox in the top right when completed
- Watch this video for Weekly Market Update help: http://joomlatraining.advisorproducts.com/weekly-update
Email Newsletter
- Login to your website’s BackOffice
-
Go to the Email Newsletter setup
- From the “Components” dropdown at the top, select “E-Newsletter”
-
Build an Email Newsletter
- Click the "E-Newsletter" button
- Enter a Subject and Title for the email
- Add in an intro if you wish. This could be your own content, an event you are planning, or a general update about your firm. Watch this tutorial video on how to add in your own content and make it appear like the other articles
- Click the "Articles" tab and select up to 5 articles for your Newsletter
- Click the "Lists" tab and select the contact lists from Constant Contact you want to distribute to
-
Review and send your email
- Click "Preview Email" to review, and make sure to send a "Test Email" to ensure everything looks great
- When you are ready, click "Send Email" and the eNewsletter will be distributed via Constant Contact!
-
View the analytics
- In your Constant Contact account click "Email" at the top
- Select the email you want to analyze
- Open rates, click through rates, and specific recipient data is available
-
Best Practices with a Constant Contact coach
- Email or call Constant Contact for a personal training session on best practices and with any questions: (866) 811-1344 or This email address is being protected from spambots. You need JavaScript enabled to view it.
- Watch this video for Email Newsletter help: http://joomlatraining.advisorproducts.com/enewsletter-training
Mass Email
- Login to your website’s BackOffice
-
Go to the Email Newsletter setup
- From the “Components” dropdown at the top, select “E-Newsletter”
- Click on "Mass Email"
- Create your own content and save it as a draft if you need.
-
Review and send your email
- Click "Preview Email" to review, and make sure to send a "Test Email" to ensure everything looks great
- When you are ready, click "Send Email" and the Mass Email will be distributed via Constant Contact!
- Watch this video for Mass Email help: http://joomlatraining.advisorproducts.com/mass-email
Email Analytics
-
Login to your Constant Contact account
- Click "Email" at the top
- Select the email you want to analyze
- Open rates, click through rates, and specific recipient data is available
-
Best Practices with a Constant Contact coach
- Email or call Constant Contact for a personal training session on best practices and with any questions: (866) 811-1344 or This email address is being protected from spambots. You need JavaScript enabled to view it.
Website Components
Social Media Dashboard
The Social Media Dashboard allows you to send prewritten tweets and status updates to your LinkedIn, Facebook and Twitter accounts. These posts contain links to articles that live on your site, so it is a great way to drive traffic to your website. It also allows you to send your own custom messages and you can use bit.ly to shorten the URL's of your site
- Login to your website's BackOffice
- Hover over the "Components" tab and select "Social Media Dashboard"
-
Click the "configuration" towards the top
- Email or call Constant Contact for a personal training session on best practices and with any questions: (866) 811-1344 or This email address is being protected from spambots. You need JavaScript enabled to view it.
- Set the Automatic Tweet Schedule to automate posts of either the most recent Featured News or Financial Briefs articles, to any social media account, at any day and time
- Click the "save" checkmark in the top right when complete
-
To manually sent specific tweets, click on the "Send" tab towards the top
- Click the circle button of any article you want to post, and three pre-written tweets will appear in the top right
- Click the tweet you wish to publish and it will display in the Tweet text box in the top left
- Check the box of the social media accounts you want to post to, and either Send Now or schedule it
- If you do not wish to automate these tweets, but want to remain active on your social media platforms, Advisor Products has a concierge social media solution for you. Email us at This email address is being protected from spambots. You need JavaScript enabled to view it. for pricing and more information.
Blog
Your website uses EasyBlog as the blogging platform. You can create multiple bloggers, multiple categories and tags, and autopost new blog entries to your social media accounts.
To navigate to the blog, login the BackOffice, hover over "Components" and select the "EasyBlog" dropdown. A basic tutorial is available here: https://www.youtube.com/watch?v=Dn0nPmSocc8
- Bloggers: click on the Bloggers button to create and edit blogger profiles. If you have multiple people writing blogs, you'll want to create a separate blogger for each.
- Categories: create multiple categories, such as "retirement planning" and "estate planning," that each blog post can go under. Consumers can then filter for a specific category when reading your blog.
- Tags: create several tags that can be applied to any blog. Blogs can have up to 5 tags each. Users can then filter for a specific tag when reading your blog.
- Autoposting: connect your Facebook, Twitter and LinkedIn accounts to automatically post to those social media accounts whenever a new blog post is created.
- Writing a Blog: click on "Blog Entries" and select "New" in the top right. You can then write your blog and select which blogger, category and tag to apply to it.
Calendar & Events
To access the calendar and create events, go to "Components" at the top of the BackOffice and select "zap-calendar." You can set up categories of events, locations and more. Create a new event by selecting the first button "Add New Event."
Search Engine Optimization (SEO)
SEO is an ongoing process done in order to boost search result rankings for certain keywords and phrases. While it may be impossible to ever get the first search result of a popular search query, such as "financial advisor New York City," there are things you can do to improve your ranking. Here are some best practices:
- Google Analytics: Used to track website traffic over time. Create an account and email your tracking code to our Service Team (This email address is being protected from spambots. You need JavaScript enabled to view it.) for us to install it on your site.
- Google My Business: Used for Google to verify your business and location, and helps customers connect with you on search, maps and Google+
- Google+: Google ranks sites with Google+ more than sites without. It's a social profile similar to Facebook or LinkedIn. You can create a profile and a link to your website.
- Email Newsletters: use our Weekly Market Update and E-Newsletter platform in the BackOffice to send emails to your clients and prospects. Links in those emails bring them back to your website, increasing your website traffic and therefore search rankings.
- Social Media Dashboard: automate posts to your social profiles that lead people back to your website. Increased website traffic will help with rankings. Additionally, Google recognizes when websites are active on their social profiles.
- Blog: Google likes websites that continually create and post new, relevant content. Advisor Products supplies their clients with news articles on an ongoing basis, but a blog is a bonus. You can also send your blog posts in emails and social media updates that tease people to go back to your website, increasing website traffic.
- Website Text Optimization: set your website up with text that is strategically written for particular service and location keywords. Advisor Products can help with that. Email us at This email address is being protected from spambots. You need JavaScript enabled to view it. for pricing and an overview.
Questions?
How and why does the Advisor Products system work?
In today’s times, when consumers have become more demanding and tech-savvy, financial advisors must use content marketing to attract, inspire, engage, and convert their prospective customers.
A good content strategy is focused on developing and distributing consistent, valuable content to engage and retain prospective customers and target audience, via your website. Our content library provides financial advisors with fresh, high-quality financial content that is updated regularly, improving SEO along the way. And our automated e-newsletter and social media tools allow advisors to reach out to clients and prospects in an easy-to-use manner, providing frequent touch points for optimal brand building.
- Differentiate you from competitors
- Expose clients and prospects to your brand message more frequently
- Build an ongoing relationship with customers
- Increase your follows and fans on social media
- Drive more prospects to your website
- Help convert prospects into leads
- Increase number of pages indexed in Google
What products and services do you offer?
Can I buy services if my website is not hosted with you?
What can I expect during the onboarding process?
What if I have questions after my website is built?
Seeing is Believing.
See how easy it is to get started with our all-in-one digital marketing platform that drives leads, encourages referrals and increases client engagement.
SCHEDULE A DEMO
MARKETING TOOLS
LEARN MORE
RESOURCES
LATEST ARTICLES


Bank instability in March added a new risk an outlook already clouded by inflation and monetary policy problems hobbling the post-pandemic recovery. The bank runs came on top of the inflation crisis caused since the pandemic of April 2020 and March 2...

March 15 was one of the most pivotal days of the past 50 years, and financial advisors played a crucial role in getting the facts out about the banking panic to their clients and community. Trouble is, your messaging must be:as timely as WSJ, NYT, CN...
WEEKLY FINANCIAL MARKETING VIDEO
Watch The Video


Advisor Websites and More
Advisor Products delivers high-quality, FINRA approved financial news articles and branded weekly financial videos published automatically to your financial advisor website. We also offer marketing tools like our easy-to-use financial blog, automated financial enewsletters, social media marketing tools to help financial advisors disseminate content quickly and easily.
Advisor Products delivers high-quality, FINRA approved financial news articles and branded weekly financial videos published automatically to your financial advisor website. We also offer marketing tools like our easy-to-use financial blog, automated financial enewsletters, social media marketing tools to help financial advisors disseminate content quickly and easily.
By using Advisor Products you agree to our use of cookies to enhance your experience I understand